Physical therapists and physical therapist assistants help you maximize your movement, manage pain, avoid surgery and prescription drugs, manage chronic (long-term) conditions, and recover from and prevent injury.
Read morePhysical Therapy Guide to Chronic Pain
Chronic pain is a condition that occurs when the brain concludes there is a threat to a person's well-being based on the many signals it receives from the body. This condition can and often does occur independently of any actual body tissue damage (due to injury or illness), and beyond normal tissue healing time.
Read moreFear Not: A Physical Therapist Can Help You Overcome the Fear of Movement
Do you avoid moving (a little or a lot) because you fear it will hurt? Does the fear of reinjury limit your activity? If so, you may be experiencing kinesiophobia. And you're not alone.
As many as 50%-70% of adults — not just athletes — experience this feeling after an injury, accident, or illness. Kinesiophobia can result from personal experience. It also can be learned by watching or mimicking the behaviors of others.
Fear is a natural response to danger or the potential threat of danger. It causes normal physical changes in the body, such as:
Increased heart rate.
Rapid breathing.
Elevated startle "jump" response.
Fear also can cause anxiety — the emotion felt when we think bad things might happen. And anxiety can cause fear, resulting in a continuing feedback loop. Ultimately, when fear and anxiety affect how we move it’s known as fear avoidance.
People who fear moving can have decreased confidence in doing daily activities and may:
Change their normal movement to feel safe. Moving in ways we are not meant to — and using muscles or joints the wrong way — can lead to new pain.
Decide that it is just better not to move at all. An inactive lifestyle can increase your risk of developing heart disease, diabetes, and obesity.
While avoidance tactics may seem to help at first, they can lead to long-term problems if continued. Movement and regular physical activity are essential for our hearts, muscles, joints, lungs, mind, spirit, and overall health.
Help Is Available
Physical therapy plays a vital role in addressing the fear of movement. Physical therapists can identify any contributing factors and teach you how to move safely. They, and the physical therapist assistants they work with, can help you get past your fear of movement.
Physical therapists are movement experts. They improve quality of life through hands-on care, patient education, and prescribed movement.
What to Expect From Physical Therapy
Physical therapy aims to restore function so you can do the activities you need and love to do.
During your initial visit, your physical therapist may:
Measure your fear of movement or reinjury. The Tampa Scale of Kinesiophobia or a questionnaire can help identify the reasons for your fear. There are a variety of possible causes.
Evaluate your overall strength, endurance, and balance.
Ask about your personal goals.
Your physical therapist will use this information to design a personalized treatment plan that may include:
Gradual exposure to activities that do not cause harm.
A strength, balance, and endurance exercise program paced for your specific needs.
Virtual reality activity exposure.
Adapted yoga.
Aquatic exercises.
Patient education. Your physical therapist can help you better understand how your body should move.
Guiding you through activities so you can focus less on your fear and improve your ability to move.
Assistance and guidance to help you set quality-of-life goals.
Your physical therapist also may recommend cognitive behavioral therapy. This treatment can help you address fear or anxiety.
Physical therapists use the latest evidence to address each person's needs, challenges, and goals to:
Improve mobility.
Manage pain and other conditions.
Recover from and prevent injury and chronic disease.
Physical therapists and physical therapist assistants empower you to take part in your recovery. They work with each other, other health care providers, and community partners to ensure you receive the best care.
Let a physical therapist help restore your movement so you can regain your physical, mental, and social health. Choose more movement for better health.
What can physical therapy help with?

What Can Physical Therapy Help With?
Physical therapists can provide supplementary treatment to a wide variety of medical conditions, depending on their specialty.
Physical therapists treat musculoskeletal conditions and work to optimize recovery or educate a person on how to optimize their movement patterns.
Some conditions that our physical therapists specializein include:
Post- op Rehab, including total knee replacements, labrum repairs, menisectomy, spinal fusion.
Conditions that affect the hand, such as carpal tunnel syndrome, and trigger finger.
Musculoskeletal dysfunction, including back pain, rotator cuss tears, and knee pain.
Sports-related injuries, such as tennis elbow, achilles tendonitis, ACL tears.
Chronic pain.
Hypermobility, leading to joint instability and pain.
How Long Should We Stretch?
How Long Should We Stretch?
When stretching our muscles, the general consensus is that we should stretch up to 60 seconds per muscle. Whether it is 20 seconds 3 times or 30 seconds 2 times as long as the muscle is stretched for 60 seconds.
There are others however who advocate a different stretch duration and repetition. Thirty years ago a man by the name of Aaron Mattes developed the 2 seconds, 10 times stretch. The premise of this technique is holding a stretch for only 2 seconds inhibits the protective stretch reflex (myotatic reflex).
The stretch reflex inhibits the muscle from lengthening for the stretch after 2 seconds. If the target muscles is indeed being inhibited then true lengthening without soreness will not occur.
The stretch is performed using Active Isolated Stretching. Using the muscle opposite in action to the target muscle to be stretched and only holding for 2 seconds, performing up to 10 repetitions with progressive increase in range of motion will allow progressive lengthening and eliminate overloading the stretched muscle which could cause potential microtears. An example would be contracting your quadriceps muscle to stretch the hamstring. By activating the quadriceps the brain then tells the hamstring to relax thus allowing the stretch.
So does it work? I put AIS to the test with myself and several patients. The muscle to be stretched was the left Middle Scalene which bends the neck to the side and is often a source of neck pain and tightness. I did not experience any rebound tightness later in the day or the following day. The increased ROM persisted for several days. One of my patients did not feel any difference between the 2 second x 10 reps stretch and the traditional 30 seconds x 2 reps stretch. The remaining 3 patients felt less soreness and improved ROM with AIS.
I then tried stretching my painful L Iliopsoas muscle. I had been doing 30 seconds x 2 reps with temporary relief (a few hours). The next day I tried the 2 seconds x 10 reps. I noticed a slight ache post stretch which resolved quickly. The pain and tightness remained improved for at least 2 days. Next, I tried stretching my non painful Hamstrings. I did not notice much of a difference between traditional stretching and AIS for reduction in tightness and duration.
My study is small and limited but it is possible the 2 second stretch works well for a painful muscle which is not responding to traditional stretching and other patient populations which have to be careful with stretching.
So which stretch to use? Check with your physical therapist if you are in rehab or other wellness provider who may be aware of both techniques. Most importantly, stretching should not make you feel worse than when you started and NEVER stretch a cold muscle.
To your health and wellness!
Joann Tippett, PT, MSPT, CKTP, CCI
30 minute stretching routine (advanced)
Level 3: Advanced Stretches
Before you begin any level of stretching, follow these tips for best results:
Warm up for a few minutes first so your muscles stretch more easily (walk briskly, march in place, or do another physical activity).
Stretch at least two to three times on each side, taking turns.
Keep good form and posture.
Breathe throughout each stretch — never hold your breath.
You should feel slight discomfort and a pulling sensation, but not pain, with each stretch.
Never bounce while stretching — hold steady till you feel the stretch and try to relax while holding.
Advanced Hamstring Stretch

Stand facing a chair or counter and put your heel on top of it. Choose a chair if you are less flexible or a counter if you are more flexible.
Keep your hips directly facing the chair and place both hands on the outside of your thigh.
Lean forward, leading with your chest. Keep your head up as you slide your hands down the outside of your thigh. Do not allow your back to round or bring your chin down.
You should feel a stretch behind your thigh and knee.
Hold this position for 15 seconds. Repeat two to three times or more, as you feel matches your fitness level.
Advanced Groin Stretch

Sit on the floor with your back against the wall. Keeping your knees straight, spread your legs apart as far as you can.
Leading with your chest, place your hands together out in front of you, and lean forward. Do not allow your back to curl or bend.
You should feel a stretch in your groin.
Hold this position for 15 seconds. Repeat two to three times or more, as you feel matches your fitness level.
Advanced Quad/Hip Flexor Stretch
Kneel on a pillow or folded towel and place one leg out in front of you (Photo A).
Leading with your waistline and keeping your chest upright, lunge forward (Photo B).
You should feel a stretch in the front of your hip. For further challenge, increase the stretch by grasping your back foot and try to bring your heel to your buttocks (Photo C).
Hold this position for 15 seconds. Repeat two to three times or more, as you feel matches your fitness level.
Advanced Calf Stretch
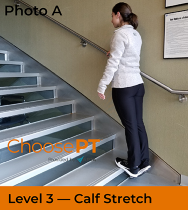
Stand on a stair with your heel over the edge.
Slowly lower your heel so it falls below the stair and you feel a stretch in the back of your calf (Photo A).
First, do this exercise with the back knee straight. Then try it with a slight bend of your knee for added stretch.
Hold this position for 15 seconds. Repeat two to three times or more, as you feel matches your fitness level.
Advanced Overhead Reach

Stand tall with your toes at the front edge of a doorway. Place the outside of both hands (little finger side) on the doorframe as high as possible (Photo A).
Do NOT lean through the door. SLOWLY step through the doorway, keeping an upright posture (Photo B).
Slowly step back to your starting position.
You can do this stretch with your arms in various positions of elevation.
Hold this position for 15 seconds. Repeat two to three times or more, as you feel matches your fitness level.
Advanced Spine Flexion and Extension

Flexion
Sit on the front edge of a chair with your feet flat on the floor and your knees spread out as wide as possible (Photo A).
Tuck your chin to your chest (Photo B) and slowly "roll down" from your head (curling down like a wave), allowing your arms and shoulders to go between your legs (Photo C).
You should feel a stretch in your spine and low back.
Hold this position for five to 10 seconds.
To come back up, "unroll" from your waist back up to an upright sitting position. Repeat two to three times or more, as you feel matches your fitness level.
Extension
Caution: If this position is too uncomfortable for you based on age or history of spine pain, do not do this exercise.
Lie on your stomach with your upper arms straight out at shoulder height, elbows bent to 90 degrees, and palms down.
"Press up" and straighten out your arms keeping your waist on the floor, then slowly return to the starting position.
Repeat this five to six times, slowly.
Repeat another one to two times, locking your elbows and allowing your back to sag and "relax" in this position for five to 10 seconds, keeping your waist on the floor, then return to your starting position.
Repeat two to three times or more, as you feel matches your fitness level.
30 minute stretching routine (moderate)
Level 2: Moderate Stretches
Moderate Hamstring Stretch

Stand facing a yoga block or footstool that doesn't slide. Use a stool or block height that is lower if you are less flexible. Increase the height of the item as you become more flexible.
Place one heel on the center of the stool, keeping your hips square/facing the stool and place both hands on the outside of your thigh (Photo A).
Lean forward, leading with your chest and keep your head up as you slide your hands down the outside of your thigh. Do not allow your back to round or bring your chin down (Photo B).
Do not round your back or lower your chin. Keep looking straight ahead.
You should feel a stretch behind your thigh and knee.
Hold this position for 15 seconds. Repeat two to three times or more as you feel matches your fitness level.
Moderate Groin Stretch
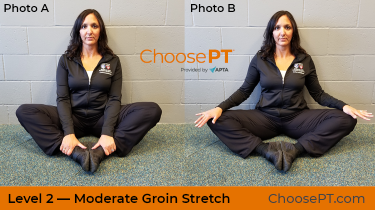
Sit on the floor with your back against the wall. Put the soles of your feet together.
Pull your heels toward your body. You should feel a stretch in your groin.
For more stretch, push down on your knees.
Hold this position for 15 seconds. Repeat two to three times or more, as you feel matches your fitness level.
Moderate Quad/Hip Flexor Stretch

Lie on your stomach.
Bring the leg you will stretch slightly out to the side, bend your knee, and loop a belt or a strap around your ankle.
Bring your knees back together. Gently pull on the strap so that your heel comes as close to your buttocks as possible.
Hold this position for 15 seconds. Repeat two to three times or more, as you feel matches your fitness level.
For more challenge:
Lie on your stomach.
Bring the leg you will stretch slightly out to the side, bend your knee and grasp your ankle, pulling your heel to your buttocks.
Bring your knees back together, keeping your heel as close to your buttocks as possible.
Hold this position for 15 seconds. Repeat two to three times or more, as you feel matches your fitness level.
Moderate Calf Stretch

Stand upright with your palms flat against a wall and the leg you want to stretch behind you (Photo A).
Turn your toes in and your heel out on your back foot (Photo B).
Leading with your waist and allowing your arms and front knee to bend, lean toward the wall, and keep the heel of your back leg on the floor.
First, do this exercise with the back knee straight. Then bend your back knee slightly while keeping your heel on the floor for added stretch.
You should feel a stretch in the back of your calf.
Hold this position for 15 seconds. Repeat two to three times or more, as you feel matches your fitness level.
Moderate Overhead Reach

Stand tall at the front edge of a doorway.
Place the outside of your hands (little finger side) on both sides of the doorway (Photo A).
Slide your hands up the doorway (Photo B), then slowly lean or step toward — but not through — the door.
Hold this position for 15 seconds. Repeat two to three times or more, as you feel matches your fitness level.
Moderate Spine Flexion and Extension

As we age, we often spend more time in a flexed posture due to prolonged sitting, poor posture, or sleeping in side-lying positions. This can cause loss of spine extension and make it difficult to stand upright and keep good posture. To combat this:
Flexion
Lie on your back and bring one knee and then the other toward your chest.
Grasp both knees with your hands and squeeze them toward your chest (Photo A).
You should feel a stretch across your back.
Hold this position for 15 seconds. Repeat two to three times or more, as you feel matches your fitness level.
Extension
Caution: If this position is too uncomfortable for you based on age or history of spine pain, do not do this exercise.
Lie on your stomach and put your arms and elbows under your chest.
Prop up on your elbows as shown and relax your back. Do not look up. Pretend you are reading a book while lying on your stomach.
If comfortable enough, hold this position for 30 seconds, then come back to a flat position lying on your stomach. Repeat two to three times or more, as you feel matches your fitness level.
Moderate Trunk Rotation Stretch

Lie on your back with your hips and knees bent. Your hands and arms should be shoulder high and stretched out to the side (Photo A).
Your arms and shoulders should stay flat on the floor.
Keeping both knees together, allow your hips and pelvis to rotate to one side (Photo B).
Hold this position for 15 seconds. Return to your starting position and complete these steps on the other side. Repeat two to three times or more for each side, as you feel matches your fitness level.
Before you begin any level of stretching, follow these tips for best results:
Warm up for a few minutes first so your muscles stretch more easily (walk briskly, march in place, or do another physical activity).
Stretch at least two to three times on each side, taking turns.
Keep good form and posture.
Breathe throughout each stretch — never hold your breath.
You should feel slight discomfort and a pulling sensation, but not pain, with each stretch.
Never bounce while stretching — hold steady till you feel the stretch and try to relax while holding.
30 minute exercise routine (advanced level)
Level 3: Advanced Strengthening Exercises
Advanced Standing Bridge for Hip Extensors

Stand upright with good posture (Photo A). You may stand near a wall for balance if needed.
Lean forward from the waist, keeping your back straight and one foot flat on the floor, while allowing the other leg to rise straight behind you and your arms to naturally hang in front of you. Use a count of 1-2. Try to get your trunk and back leg parallel with the floor (Photo B).
Hold this position for five seconds, then count 1-2-3-4 to slowly return to the starting position. It should take you longer to return to your starting position than to get to your bridge position. Control is important.
Repeat with your other leg. Repeat as many times as you feel matches your fitness level.
Note: To make this exercise more challenging, hold weights or small heavy objects in your hands.
Advanced Sidelying Leg Lift for Hip Abductors

Lie on your side with the bottom leg bent (Photo A). Roll your hips forward about 30 degrees.
Lift your upper leg slowly to the count of 1-2 (Photo B).
Then, slowly return your leg to the start position with a count of 1-2-3-4. Control is important.
Repeat as many times as you feel matches your fitness level.
Advanced Stair Dips for Quad Strength
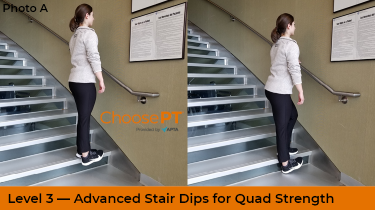
Stand on your left leg on the bottom stair with your right leg over the edge of the stair. Use the handrail for balance as needed. Keeping an upright posture, flex your right foot so that your toes are up (Photo A).
Allow your left knee to bend and slowly lower your right heel to the count of 1-2-3-4 so that it gently touches the floor, without putting your weight on it. Pretend that your heel is touching an eggshell, so as not to break it (Photo B).
Straighten your left knee to return to your starting position using a count of 1-2. It should take you longer to step down than to step up.
Repeat as many times as you feel matches your fitness level.
Repeat with the opposite leg.
Advanced Heel Raises for Calf Strength

Stand on the bottom stair on the front of one foot, so that your heel is off the edge of the stair and your other leg is hanging, not supporting you. Use the rail for balance if needed.
Slowly lower your heel below the level of the stairs to the count of 1-2-3-4 (Photo A). Control is important.
Then, rise onto your toes to the count of 1-2 so that your heel is up as high as possible (Photo B), your other foot still hanging, and not providing support.
Repeat as many times as you feel matches your fitness level.
Repeat with the other leg.
Advanced Abdominal Exercises

Back lying
Lie on your back with your hips and knees bent to 90 degrees and your feet off the floor. Pull your navel inward and down toward your spine, and flatten your lower back against the floor (Photo A).
Slowly extend your legs out until you feel your pelvis start to rock forward. When you feel this, bring your knees back toward you by about 1/8 to 1/4 inch (Photo B).
Hold this position for 15 seconds, making sure to count out loud, so you do not hold your breath.
To release this position, bring your knees toward the chest, then lower your feet to the floor.
Repeat as many times as you feel matches your fitness level.
Note: To make this exercise more challenging, cross your arms across your chest.
Plank
Lie on your stomach supported by your elbows and with your toes dug into the floor.
Tighten your back and stomach muscles, and then lift your torso off the bed or floor so that you are supported by your toes and elbows (Photo C).
Hold this position for 30 seconds.
Repeat as many times as you feel matches your fitness level.
Advanced Push-ups for Pecs/Triceps

Knee ups
Lie on your stomach with your palms on the floor at shoulder level (Photo A).
Keep your knees on the floor and push up with your hands to the count of 1-2 to attain a modified push-up position (Photo B).
Return to your starting position to the count of 1-2-3-4. Repeat as many times as you feel matches your fitness level.
Note: If you have enough strength, you may do full push-ups.
Full push-ups

Lie on your stomach with your palms on the floor at shoulder level and dig your toes into the floor (Photo C).
Push up with your hands to the count of 1-2 to attain a full push-up position, making sure to keep your back straight (Photo D).
Return to your starting position to the count of 1-2-3-4. Repeat as many times as you feel matches your fitness level.
Advanced Shoulder I, T, Y, W Exercise for Rotator Cuff/Scapula

Note: This exercise requires a large exercise ball or an ottoman and light hand weights or 16- to 20-ounce bottles.
Kneel on the floor and put your chest on the exercise ball or ottoman (Photo A).
With a small weight in each hand, lift your arms to the count of 1-2 to form the letter "I" by raising them straight out in front of you (Photo I). Then, slowly lower your arms to the starting position counting 1-2-3-4.
Next, lift your arms to the count of 1-2 to form the letter "T" by raising them out to the side (Photo T). Then, slowly lower your arms to the starting position counting 1-2-3-4.
Next, lift your arms to the count of 1-2 to form the letter "Y" by raising them at an angle in front of you. Then, slowly lower your arms to the starting position counting 1-2-3-4.
Last, lift your arms to the count of 1-2 to form the letter "W" by raising them with elbows slightly bent and out to the sides (Photo W).
Do each of these slowly. Control is important.
Repeat as many times as you feel matches your fitness level.
Advanced Bicep Curl With Overhead Press

Note: This exercise requires the use of small hand weights (10-15 pounds) or other objects that you can easily grasp with your hands and lift overhead. If you do not have weights, then 16- or 20-ounce water bottles, canned goods, or quart-sized milk or juice containers will work. Add more repetitions to challenge your muscles if you cannot increase the weight.
Stand upright with good posture, holding your weights in each hand with your arms at your sides (Photo A).
Slowly bend your elbows and curl your weights up to a 1-2 count until your elbows are at 90 degrees (Photo B).
Then, slowly press your weights overhead to a 1-2 count (Photo C).
Slowly return to your starting position counting 1-2-3-4. Control is important.
Repeat as many times as you feel matches your fitness level.
30 minute exercise routine (moderate level)
Level 2: Moderate Strengthening Exercises
Moderate Single-leg Bridge for Hip Extensors
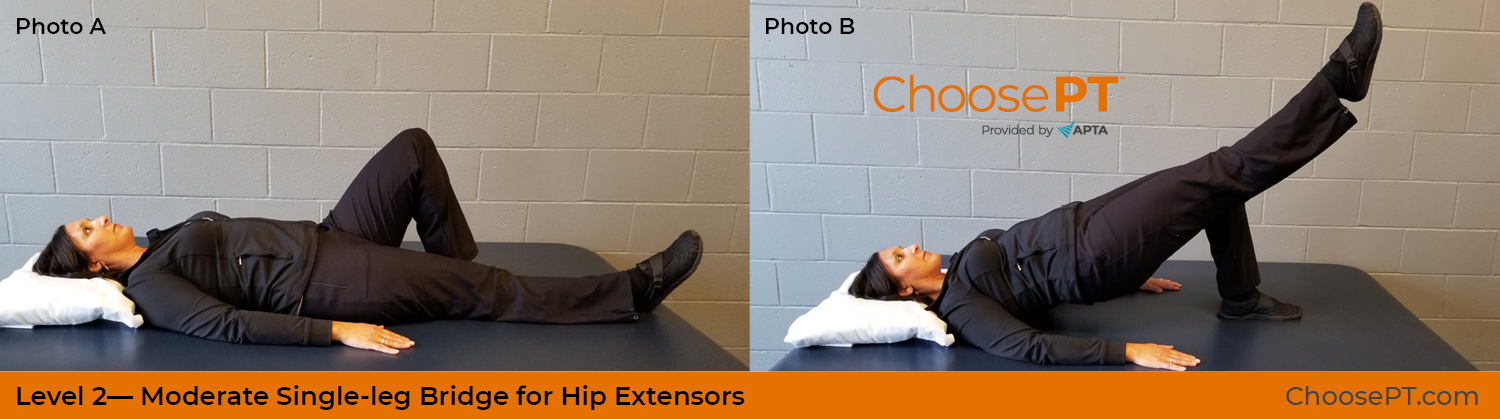
Lie on your back with one knee bent and that foot on the floor, and one leg straight out, with your hands palm down at your side (Photo A).
Press into the floor from your hips through your foot on your bent leg, and lift your buttocks and your outstretched leg while counting 1-2 until your thighs are evenly lined up to obtain this bridge position (Photo B).
Hold this position for five seconds, then slowly return to start to the count of 1-2-3-4. It should take you longer to return to start. Control is important.
Repeat as many times as you feel matches your fitness level.
Repeat with your other leg.
Note: To make this exercise more challenging, bend your elbows, or reach up to the ceiling with your hands and arms while doing the bridge exercise.
Sidelying clam shell

Lie on your side with your hips and knees bent (Photo A).
Keeping your hips perpendicular to the floor, lift your upper leg to the count of "1-2" (Photo B).
Return to your starting position slowly as you count "1-2-3-4" aloud. Control is important.
Repeat as many times as you feel matches your fitness level.
Repeat with on the other side.
Note: To make this exercise more challenging, tie an elastic exercise band or bungee cord around your legs, just above the knee to add resistance (Photo C).
OR Seated clam shell

Sit in a chair with good posture. Put your knees together and your feet flat on the floor.
Loop an elastic exercise band or bungee cord from below and cross the ends over your legs just above your knees, and hold the band in this position (Photo A).
Keeping your feet together, spread your knees apart as you count 1-2 (Photo B).
Return to your starting position even more slowly while counting 1-2-3-4. Control is important.
Repeat as many times as you feel matches your fitness level.
Moderate Stair Step for Quad Strength

Stand on the ground in front of a step/set of stairs. Use the handrail for balance as needed. Place your left (leading) foot on the first step (Photo A).
Step up one step with your right leg, so that both feet are on the first step (Photo B). Do these two movements to a count of 1-2.
Keeping your left foot on the step, step down backward with your right leg to return to your starting position to the count of 1-2-3-4.
Repeat as many times as you feel matches your fitness level.
Repeat with the opposite leg as the leading leg.
Moderate Heel Raise for Calf Strength

Stand on the bottom step with both feet and let your heels extend over the edge of the step (Photo A). Use the handrail for balance as needed.
Slowly lower your heels below the level of the step and then rise onto your toes, so your heels are as high as possible (Photo B). Do this to the count of 1-2.
Slowly return to your starting position to the count of 1-2-3-4. Control is important.
Repeat as many times as you feel matches your fitness level.
Moderate Half Sit-ups for Abdominal Strength

Lie on your back with your hips and knees bent, feet flat on the floor, and one hand on top of each thigh (Photo A).
Tuck your chin to your chest and sit up enough so that your hands reach the top of your knees. You do not need to sit up farther. Only your shoulders need to come off the floor.
Hold this position for a count of 10. Make sure that you count out loud, so you do not hold your breath.
Repeat as many times as you feel matches your fitness level.
Note: To make this exercise more challenging, cross your arms over your chest while lifting your shoulders off the floor and hold for a count of 10.
Moderate Counter-Facing Press for Pecs/Triceps

Stand a little more than an arm's length away from a counter or heavy piece of furniture (Photo A).
Keeping your whole body in line, lower your body toward the counter to the count of 1-2 (Photo B).
Press away from the counter to return to your starting position with a count of 1-2-3-4. Repeat as many times as you feel matches your fitness level.
Moderate Standing Row for Rotator Cuff/Scapula

Note: This exercise requires an elastic exercise band or bungee cord.
Open a closet door or other stable door. Wrap the band around the inside door handle and close the door so you are outside the closed door. With your arms out in front of you, hold the ends of the band (Photo A).
Stand upright with good posture. Keeping your shoulders down, squeeze your shoulder blades together while pulling back with your arms to the count of 1-2, until your elbows come to your sides (Photo B).
Slowly return to your starting position to the count of 1-2-3-4. It should take you longer to return to your start. Control is important.
Repeat as many times as you feel matches your fitness level.
Moderate Biceps Curl with Overhead Press
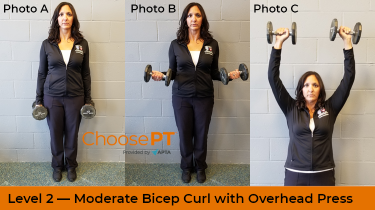
Note: This exercise requires the use of small hand weights (5-8 pounds) or other objects that you can easily grasp with your hands and lift overhead. If you do not have weights, 16- or 20-ounce water bottles, canned goods, or quart-sized milk or juice containers will work. Add more repetitions to challenge your muscles if you cannot increase the weight.
Stand upright with good posture, holding your weights in each hand with your arms at your sides (Photo A).
Slowly bend your elbows and curl your weights up to a 1-2 count until your elbows are at 90 degrees (Photo B).
Then, slowly press your weights overhead to a 1-2 count (Photo C).
Slowly return to your starting position using a count of 1-2-3-4. Control is important.
Repeat as many times as you feel matches your fitness level.
30 minute stretching routine (easy)
Level 1: Easy Stretches
Easy Hamstring Stretch

Lie on your back, bend one knee, and place both hands behind your thigh (Photo A).
Your hip should be bent to 90 degrees with your thigh pointing straight at the ceiling.
Straighten out your knee as far as you can. Keep your thigh pointing to the ceiling and your other leg flat on the floor or bed (Photo B). You should feel a stretch behind your thigh and knee.
Hold this position for 15 seconds. Repeat two to three times or more, as you feel matches your fitness level.
Easy Groin Stretch

Stand with your legs shoulder width apart.
Lunge to one side, allowing your lunging knee to bend.
You should feel a stretch in the groin area of the leg you kept straight.
Hold this position for 15 seconds. Repeat two to three times or more, as you feel matches your fitness level.
Easy Quad and Hip Flexor Stretch

Stand next to a wall to assist with balance and place a chair directly behind you.
Face away from the chair and place the top of your shin and foot on the chair (Photo A).
Try to keep your knees in line and as close together as possible.
Slowly push your waistline/belt forward to get more stretch.
Hold this position for 15 seconds. Repeat two to three times or more, as you feel matches your fitness level.
For more challenge, remove the chair and do the following:
Stand next to a wall to help with balance.
Bend your knee and grasp your ankle (Photo B).
Pull your heel toward your buttocks, keeping your legs in line with one another.
Keep your knees as close together as possible.
Hold this position for 15 seconds. Repeat two to three times or more, as you feel matches your fitness level.
Easy Calf Stretch

Sit in a chair with one leg out in front of you.
Loop a belt or a strap around the bottom of the front of the foot on your outstretched leg.
Gently pull the strap so that your toes come toward you as your heel stays in place on the floor.
You should feel a stretch in the back of your calf.
Hold this position for 15 seconds. Repeat two to three times or more, as you feel matches your fitness level.
Easy Overhead Reach

Stand with the back of your heels against a wall. Stand upright as tall as you can with good posture (Photo A).
Keeping your best posture and your back against the wall, slowly raise your arms in front of you, reaching. Try to get your arms/hands all the way back to the wall or go as far as you can. Reach up toward the ceiling to feel the stretch (Photo B).
Then slowly bring your arms down to your side, so they are level with the floor (Photo C).
Try to keep your arms and hands against the wall if you can, then slowly return to the starting position.
Do these movements slowly and steadily.
Repeat two to three times or more, as you feel matches your fitness level.
Easy Spine Flexion and Extension

Lie on your back and bend one hip and knee up toward your chest (Photo A).
Grasp your knee with your hands and squeeze it toward your chest.
You should feel a stretch across your back.
Hold this position for 15 seconds. Repeat two to three times or more, as you feel matches your fitness level.
As we age, we often spend more time in a flexed posture due to sitting for long periods of time, poor posture, or sleeping in side-lying positions. This can cause loss of spine extension and make it difficult to stand upright. To combat this:
Lie face down on your stomach on the floor (Photo B). If you do not typically lie on your stomach, try to hold this position for 20-30 seconds. You may feel a stretch in your back across your waistline.
Then roll back onto your side for 30 seconds to relax this stretch.
Repeat two to three times or more, as you feel matches your fitness level.
If this position is too uncomfortable for you based on age or history of spine pain, do not do this exercise without talking with your physical therapist.
Easy Trunk Rotation

Start by sitting on the front edge of an armchair with your feet flat on the floor and your hips facing forward (Photo A).
With one arm reach across to the opposite arm of the chair and gently pull/turn your shoulders and upper body to that side (Photo B).
Do not allow your hips/pelvis to rotate. Keep pelvis facing forward.
Hold this position for 15 seconds.
Return to your starting position and repeat on the other side.
Repeat two to three times or more, as you feel matches your fitness level.
Before you begin any level of stretching, follow these tips for best results:
Warm up for a few minutes first so your muscles stretch more easily (walk briskly, march in place, or do another physical activity).
Stretch at least two to three times on each side, taking turns.
Keep good form and posture.
Breathe throughout each stretch — never hold your breath.
You should feel slight discomfort and a pulling sensation, but not pain, with each stretch.
Never bounce while stretching — hold steady till you feel the stretch and try to relax while holding.